By Ryan Hunter - August 29, 2023
GPT4ALL is an ecosystem to train and deploy powerful and customized large language models that run locally on consumer-grade computers.
The really cool thing is that it takes very little in the way of configuration, and offers multiple models that one can test out and play with. The GPT4ALL project is under active development, and sees pretty frequent updates and new features.
Getting the Most Out of This Guide
Periodically, there will be industry-specific terms that I can't avoid using. I've done my best to make any of those terms links, which will take you to the bottom of this document where you will find a collection of key terms and definitions.
If you run into a stumbling block, I can be reached by email. Please keep in mind that I do not personally own any Apple computer hardware, so Apple-specific questions are something I can't really help with.
Getting the Installer
First thing's first. You'll need to download the installer file for GPT4ALL. The installer can be found at nomic.ai's gpt4all.io webpage. Just look for the part of the site that matches the image below and click on the corresponding button for your computer's operating system.

Make sure sure you pay attention to where your browser saves the file.
Installation Process
The steps to start the installer vary by operating system.
Just take me to the next part.
Windows Install
To launch the windows installation process, just double-click the installer file that you downloaded. At
time of writing, the filename would be gpt4all-installer-win64.exe.
Important: Note that GPT4ALL only runs on Windows 10 and above.
Mac OSX Install
Installing on Mac OSX can be accomplished in the following steps:
- Locate the installer file you downloaded. At time of writing, the filename should be
gpt4all-installer-darwin.dmg. - Double-click the DMG file to mount it. OSX will verify the file and then mount it as a virtual disk on your desktop or in the Finder sidebar under "Devices".
- Once you open the DMG file, you'll see an icon for the GPT4ALL installer. Double-click this and it should run the installer. You can proceed below.
Ubuntu Install
To launch the Ubuntu installation process, just double click the installer file that you downloaded. At
time of writing, the filename would be gpt4all-installer-linux.run. Note that if you are
not running the most recent version of Ubuntu, the install may fail, and your only option will be to
compile from source. That is outside the scope of this guide.
Applies to All Operating Systems
Regardless of what operating system you are running, you should now see a screen that looks something like this:
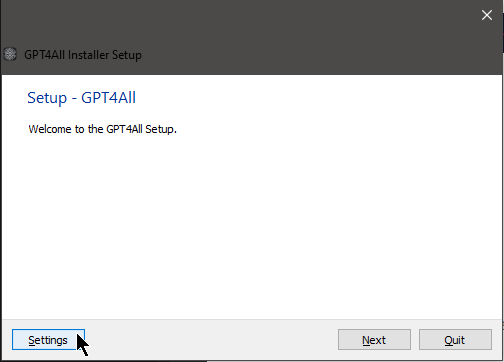
Do not click "Settings"!
Ignore the Settings button and just click on Next. 99.9% of users will not have
a use-case for anything under the Settings screen.
Next, we'll choose an installation folder. My advice is to accept the default that it suggests.
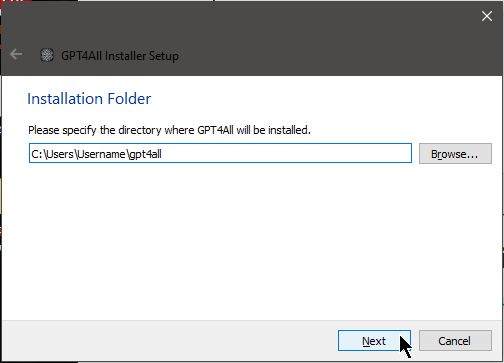
This is yet another of those 'just click Next' situations.
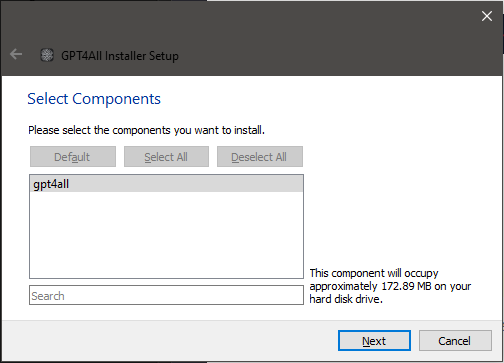
The next screen is to select components. One day, there may be more to choose here, but for now — say it
with me — just click Next.
Now for everyone's favorite bedtime reading: The End User License Agreement! Actually, the license is pretty short and sweet, and is a standard MIT License. Check it out really quick and just click Next.
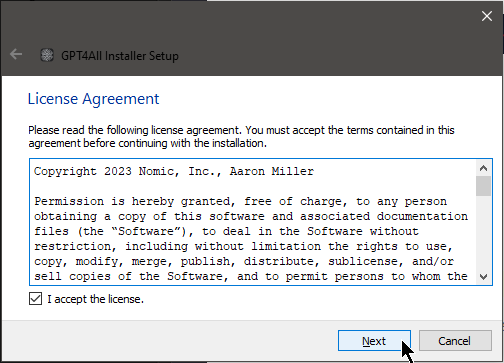
Don't forget to check the "I accept the license." box in order to proceed!
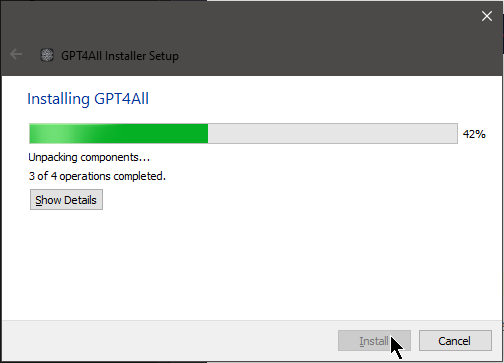
Now you should see a few loading bars, not that it'll take long. The installer is just unpacking some files into the installation folder needed for the program to run.
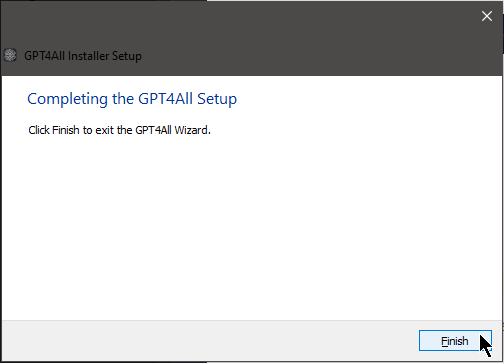
And that's it for the installer! Just click Finish to close it out, and then we can get
to the fun part.
Privacy Options

GPT4ALL's privacy options shown on first run.
When you launch GPT4ALL for the first time, you'll see a screen with some privacy options. it will ask you about potentially sharing some information with nomic.ai, the group that created GPT4ALL. At time of writing, this is the explanation featured on this page:
By enabling these features, you will be able to participate in the democratic process of training a large language model by contributing data for future model improvements.
When a GPT4All model responds to you and you have opted-in, your conversation will be sent to the GPT4All Open Source Datalake. Additionally, you can like/dislike its response. If you dislike a response, you can suggest an alternative response. This data will be collected and aggregated in the GPT4All Datalake.
NOTE: By turning on this feature, you will be sending your data to the GPT4All Open Source Datalake. You should have no expectation of chat privacy when this feature is enabled. You should; however, have an expectation of an optional attribution if you wish. Your chat data will be openly available for anyone to download and will be used by Nomic AI to improve future GPT4All models. Nomic AI will retain all attribution information attached to your data and you will be credited as a contributor to any GPT4All model release that uses your data!
The first option is an opt-in to send anonymous usage analytics used to improve GPT4ALL. This means stuff
like which features people use most, what settings they're using with their models, and when the
program runs into errors. This is pretty standard, and most retail software out there does this by
default. Saying Yes definitely helps the developers make the program better, but that's
a personal judgement call. And privacy choice is sacred in the open source
software community.
The second option is to enable sharing the content of your actual chats with nomic.ai's "data
lake", which is a neat-sounding term for "giant pile of potential training material" that
they could theoretically use to train or refine other AI models, in some capacity. If you're working
on something you'd rather keep private, I'd definitely select No here.
Installing a Model
This is the last stage of the setup process, and soon you'll be ready to start chatting with your new personal, private AI model(s)!
The next screen that will appear will ask you about just which model(s) you want to install. Here are some important considerations:
-
Your computer must have enough RAM (Random Access Memory), measured in gigabytes (GB).
- To run a small model, you will need a minimum of 8 GB of RAM.
- To run a mid-size model, you will need a minimum of 16 GB of RAM.
- Before you despair, note that it is quite easy to upgrade RAM in most computers. There are tons of YouTube videos out there. Or consult with your local computer person!
-
Your computer must have enough free space on your storage disk(s) to download a model.
- Typically, GPT4ALL models will be between 4 and 8 GB each.
-
The speed at which these models can generate text will be constrained by how fast of a processor (aka CPU) your machine has. GPT4ALL can run on some pretty low-end machines, but it may take longer to generate. Bigger models will inherently run slower, so if you are using a lower-end machine, consider trying a smaller model first.
-
You may see notes like "Cannot be used commercially" or "Licensed for commercial use". This does not mean you cannot use these models to produce text for your own business. Rather, it indicates whether you can charge other people for access to services that use these models.
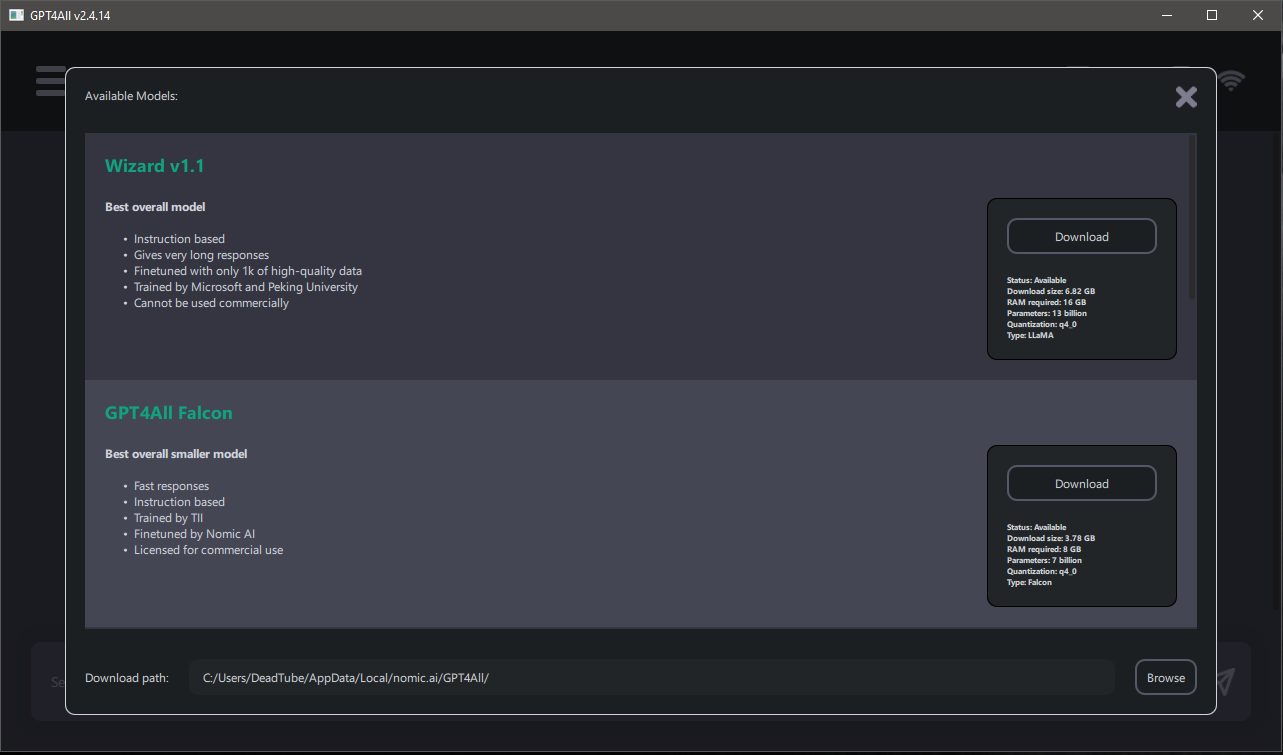
The GPT4ALL model download screen.
You'll notice that next to each model is a convenient little reference card. Take a look at the one below:
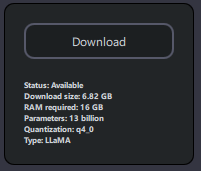
Let's walk through what each item on this card means.
-
Status
- Whether the model is currently available to download. It's rare you won't see this
say
Available.
- Whether the model is currently available to download. It's rare you won't see this
say
-
Download size
- This is the amount of space this particular model will take up on your disk.
-
RAM required
- Generally, whatever the model's download size is, you'll need a little over two times that amount of RAM available to run it. This is because the model must be loaded into memory, then even more memory is used to actually generate the text.
-
Parameters
- A 'parameter' is a value that the model adjusts during training, like turning the knobs on a machine to make it work just right. Generally, the higher the parameter count, the more capable the model. Common parameter counts are 7B, 13B, 30B, and 70B for home AI. Though for 30B and 70B models to be run locally, significant financial investment in computing hardware is required, for now.
-
Quantization
- Honestly, most people can ignore this one. It specifies exactly how the model was packaged.
-
Type
- The taxonomy of model types is almost as complicated as the Tree of Life. But, for our purposes, really just know that most models people are running now are derived from LLaMA, an AI model project that originated at Facebook. This can be ignored by most.
After looking at how much RAM you have to work with in your computer, decide on a model. Below are my recommendations for various use cases.
Wizard v1.1
-
Pros
- A good all-arounder for general research and questions.
- Capable of adopting personas with the correct prompting.
- 13B parameter count means it can capture more intricate patterns in data and information.
-
Cons
- A midsize model (13B), so it requires a bit more RAM to run than your average computer ships with.
- Can be much slower on computers with weak processors.
- Censored.
GPT4ALL Falcon
-
Pros
- Excellent for quick look-ups.
- Fast text generation speed.
- A small model (7B), so its RAM requirements are more reasonable for average computers circa 2023.
-
Cons
- Less accurate than larger models
- Struggles with adopting personas
Hermes
-
Pros
- Uncensored
- Capable of adopting personas.
- Good for assisting with action or steamy romance scenes.
-
Cons
- A midsize model (13B), so it requires a bit more RAM to run than your average computer ships with.
- Can be much slower on computers with weak processors.
It should be noted there are many more models available than the ones I have listed above, but that should be good enough to get you started.
A Tour of the User Interface (UI)
Below you'll see an example of GPT4ALL's main screen. Think of it like a standard text chat. If you have ever used OpenAI's ChatGPT, it is quite similar in terms of layout.
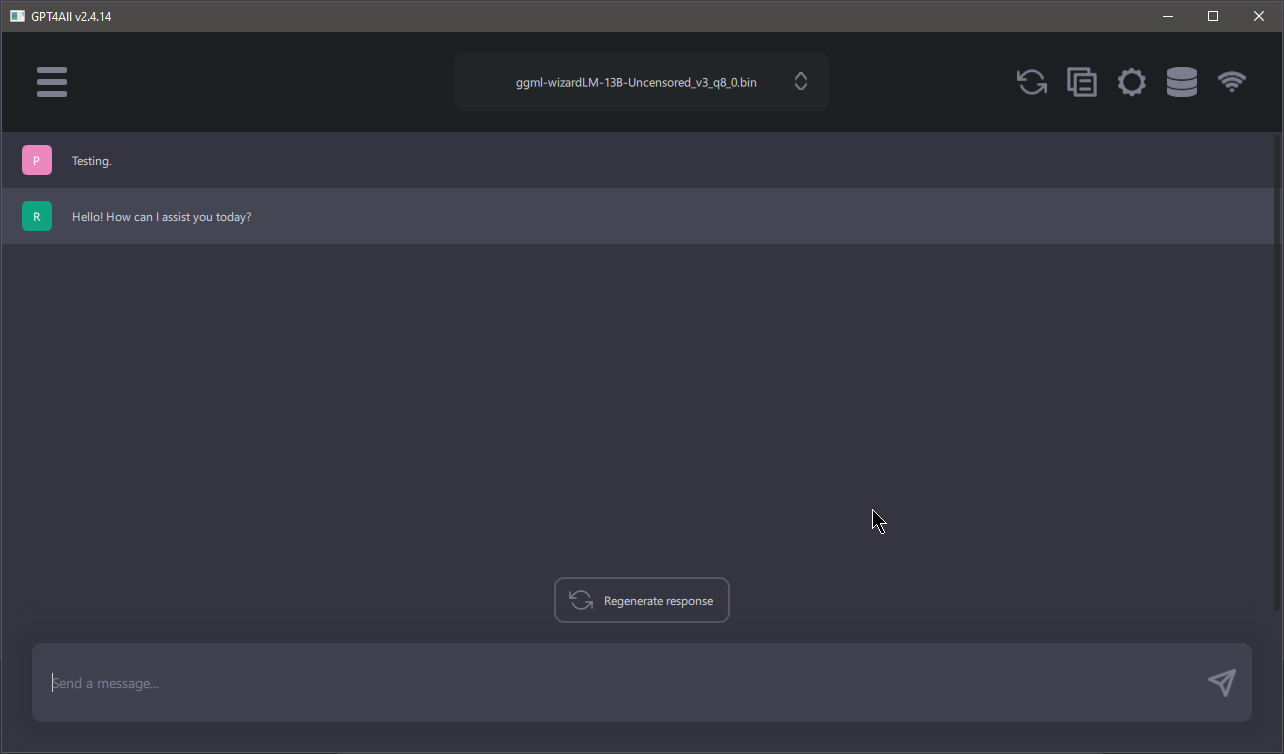
At the top is a drop-down menu that allows you to select which model you would like to use. This is how you switch between them if you download multiple models.
At the bottom is a text entry box. You can either press Enter or click the arrow at the
right of the text-entry box to send your message to your AI model once it's loaded.
The Regenerate response button at the bottom of the main chat area will cause the AI to
retry responding to the last thing that you sent it. Note that the response may be identical to the last
one you received, depending on certain settings (which we will dive into in the next section).
Settings and Parameters
Click the gear icon ![]() at the top-right to access the Settings screen.
at the top-right to access the Settings screen.
A screen should appear, showing options like those in the example below:
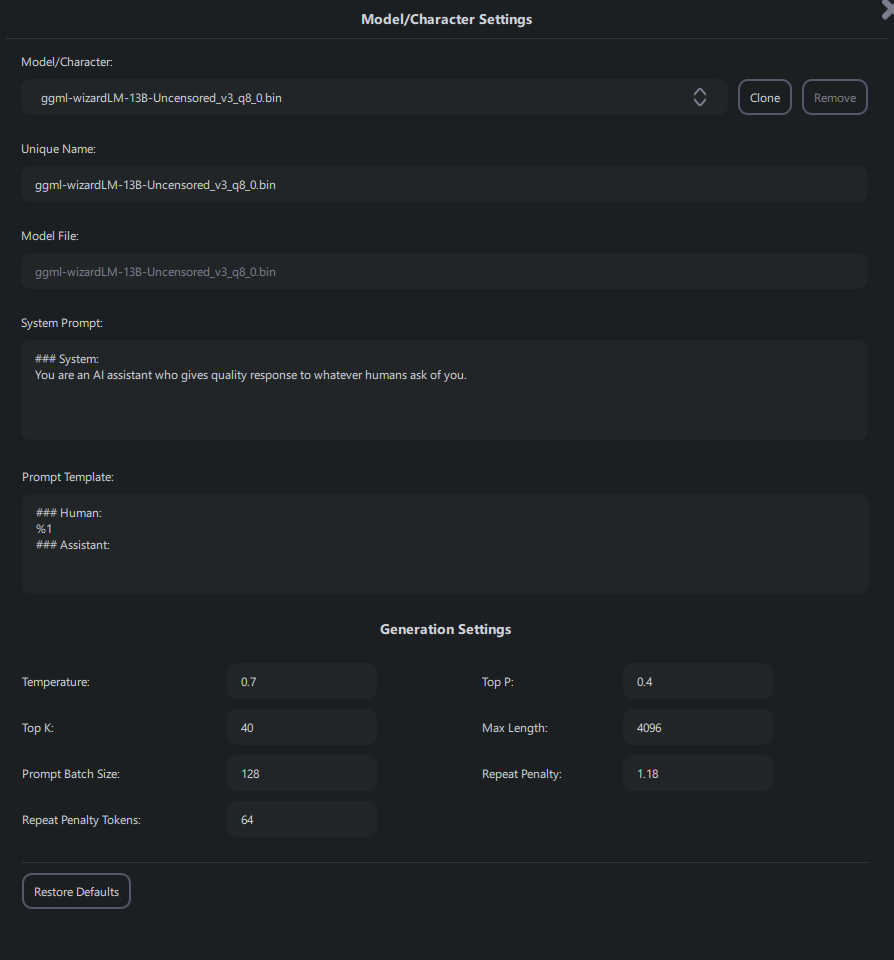
Now, let's take a look at what each of these things does:
Model / Character
This is a dropdown that allows you to select the model you want to adjust the settings for. Make sure you
have the correct one selected! So far as the Clone button goes, the gist is that you can
add a new entry in the list based off the currently-selected model or character and adjust it. Let's
say you have already cloned your model once, named it "Johnny 5", and given it a list of
personality traits in the System Prompt portion (see System Prompt section below). Well, what if Johnny
5 is close to what you imagined, but not quite? You could clone Johnny 5 and name the new character
Johnny 6, making any tweaks to his personality you wanted to try out.
Note that all of your models will always appear in this list, in addition to any sets of custom settings. It is strongly advised you give your sets of custom settings a unique name (see next item) to help differentiate them.
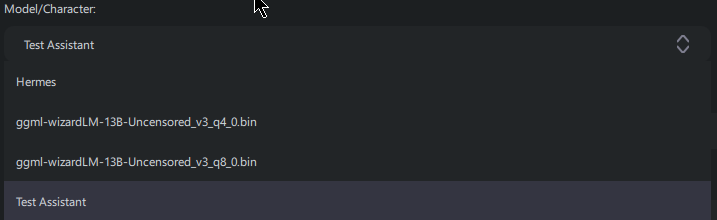
Unique Name
The name you want to give to this particular set of settings for your model. For an example, let's
imagine I've cloned my ggml-wizardLM-13B-Uncensored_v3_q8_0.bin model and given it a
unique name of Test Assitant, so I could have a place to save settings for that model to
act like a personal assistant. In the image below, you can see how these would appear in the
Model/Character dropdown.
Model File
This field cannot be changed, and is just a helpful indicator of which model your custom settings are being applied to.
System Prompt
This is where you set what is called the Fixed Context, or a piece of information that is always sent to the AI with every query you ask of it. This is in contrast to the Dynamic Context. You can find many alternative prompts to this at jailbreakchat.com.
Prompt Template
I wouldn't advise messing with this. Models downloaded directly through GPT4ALL should not require changing this in any way. However, models acquired and added from outside of the GPT4ALL program (for example, from Hugging Face) may require you to change this. Once more, this is outside the scope of this guide.
Generation Settings
Now we get to the meat of really tweaking AI. Most of these settings can be thought of as how 'random' the results from an AI text model will be when it responds to user input. Essentially, these are all parameters in very fancy probability equations.
-
Temperature
- The primary factor to control randomness of outputs. A value of 0 would be highly deterministic. A higher value means much more randomness. To put it another way, low values will result in more dry, academic prose, while extremely high values will result in the AI 'hallucinating', or basically just vomiting out unintelligible garbage. Imagine Hunter S. Thompson high on every illicit substance imaginable.
- Reasonable starting value: 0.7
-
Top P
- If not set to 1, the AI will select tokens with probabilities adding up to less than this number. Higher value means a higher range of possible random results.
- Really just play with this value. Reasonable values range from 0.1 to 1.0.
-
Top K
- Every time the AI is going to pick the next token, it will only choose from the top 'K' most likely tokens, where K is the value you set here. Higher value means a higher range of possible random results.
- Really just play with this value. Reasonable values range from 20 to 150.
-
Max Length
- The maximum length of response, in tokens.
- Reasonable starting value: 1024 (for chatting), 4096 (for long form generation)
-
Prompt Batch Size
- How many tokens the AI will ingest at a time from the prompt. Higher is generally better, but can consume more computer resources. Turn this down if you run into errors, but I find 512 to be a reasonable value for modestly-powered machines.
-
Repeat Penalty
-
Repeat Penalty Tokens
- The number of most recent tokens to consider for repetition penalty. Higher values mean better results, but consume more resources. I find that 128 is a decent setting to start from, and crank up from there if you have a more powerful computer.
- Reasonable starting value: 128
Note: If you ever adjust some things that don't go according to plan and
feel lost, don't forget hitting Restore Defaults is always an option! In the words of
the great Douglas Adams, "Don't Panic!"
Important Terms and Definitions
If you've felt lost at any point with some of the terms, don't worry. Lots of people are, even those actively participating in the AI space. And there aren't many great resources available to look them up, for the moment. So here's a few key terms to help you out:
CPU / Central Processing Unit
The 'brains' of any computer. This is the chip that handles running most calculations for day-to-day tasks. If you've heard people talk about Intel or AMD chips, this is generally what they're referring to. GPT4ALL uses the CPU to run text generation AI models.
RAM / Random Access Memory
Temporary storage used by computers to load programs from storage volumes ('hard drives' and 'solid state drives', generally). The reason for this is that long-term storage is incredibly slow compared to RAM. You may be asking yourself why we don't use RAM to store everything if it's so much faster. The answer is that RAM does not retain any of the data stored on it once it loses power. So once your machine is turned off, everything that was in it is as good as gone.
Open Source
Software that is developed in a public, collaborative way, where the programming code that allows it to run is available for anyone to view and audit. This stands in contrast to 'closed source' software. The overwhelming majority of retail software is closed source.
Tokens
Tokens are not words, but more like syllables (-ish). An example is won't. It is
comprised of two tokens. won and 't. After the AI would choose a token
like won, it could choose from tokens such as 't or
'tcha, depending on overall likelihood.
Model
In the context of text generating AI, a model is the actual file(s) that contain all of the relational data that allows an AI to generate text. This relational data is formed by feeding training material into an AI, which then causes the AI model to adjust its internal parameters. It's intentionally similar to how the human brain arranges neuronal connections to form memories, though grossly simplified by comparison.
Prompt
A prompt, when relating to AI, refers to an input or instruction given to the model with the goal of eliciting a specific type of response or output. It serves as a starting point, or cue, for the AI to generate content, answer questions, or perform a specific task. The response the model gives is based on patterns it has observed from its training data, as well as how the prompt is crafted in 'guiding' its response through those patterns. A well-crafted prompt will produce more accurate, relevant, or contextually appropriate outputs.
Context
The surrounding information or text that the AI model uses to generate relevant and coherent responses. It's the input or background information that the model considers when deciding what words or sentences to produce next. The context ensures that the AI's output is not entirely random, but rather based on the provided input or previous parts of a conversation.
Context Window
The fixed number of most recent words or tokens the model can see and consider at once when generating a response. If the conversation or input exceeds this limit, the model might lose or not see the earlier parts, affecting its understanding and the coherence of its replies.
Different AI models have different lengths of context window. Here are some common contexts:
| Context Window Length | Shorthand |
|---|---|
| 4,096 Tokens | 4K |
| 8,192 Tokens | 8K |
| 16,384 Tokens | 16K |
| 32,768 Tokens | 32K |
Note that I have included the values here in this table in case you intend to use them with various models down the road. There are models readily available via Hugging Face that are compatible with GPT4ALL and possess an 8K context window. Larger context windows require more RAM.
If you're wondering why those numbers in the leftmost column look so funky, the short answer is that computers use base-2 mathematics, unlike the base-10 that most people are comfortable with.
The context window is composed of three components: The fixed context, the dynamic context, and the current user input (aka the prompt). If you are using a model with a 4K context window (meaning 4,096 tokens), and your fixed context is 1024 tokens in length, then you would have 3,072 tokens left for dynamic context and your next input.
Fixed Context / Static Context / Permanent Context
All three terms are used interchangeably (the burdens of a young field of study). The fixed context refers to information that is sent to your AI every time you give it some input (so basically, in GPT4ALL, that would be every time you hit 'send' on a message to the AI). No matter how long your conversation gets, this part never goes away.
Fixed context can be used for a lot of things. It can be used to give the AI details of the project you are currently working on that it needs to take into account while assisting you. It could be used to give the AI the personality traits, backstory, and description of a character that you want it to emulate. It can also be used to give the AI a brief summary of a previous conversation you had with it, rather than having to give it the entire transcript and filling up your whole context window.
Dynamic Context
The dynamic context is just whatever is left of the overall context window once you take the fixed context into account. Most programs for interacting with AI will fill this remainder of the context window with your chat history with your AI, starting with the most recent portion of your conversation and working backwards in reverse chronological order until it hits the maximum number of tokens for your model's context window.